


The list of Text and Special HTML Characters that can be found in the Insert Menu:

To change the Font Type:
1. Select the text you want to change.
2. On the Properties Window, select the Font Type you want.

To change the Font Size:
1. Select the text you want to change.
2. On the Properties Window, select the Font Size you want. You can choose a point size or HTML size (1-7).

To change Font Color:
1. Select the text you want to change.
2. On the Properties Window, click to open the available color.

To apply Font Style:
1. Select the text you want to change.
2. On the Properties Window, click on the style that you want:
o Bold
o Underline
o Italic
o Strikethrough
o Subscript
Paragraph Alignment

Applying Paragraph Alignment:
1. Select the paragraph you want to change.
2. On the Properties Window, click on the alignment that you want:
o Left Align
o Right Align
o Center Align
o Justify
The SEC EDGAR system only allows 3 types of hyperlinks, which are all supported by SEC Publisher:
1.
Internal hyperlink within a document. This type of hyperlink is
often used in a Table of Contents to jump to a specific page within
the same document.
2.
External hyperlink to a different document within the same filing.
This type of hyperlink is often used to link to exhibits included
in the filing.
3. External hyperlink to a previous filing in the SEC archives.
To add hyperlinks in SEC Publisher, enable the Bottom Toolbars in the HTML Editor by clicking on View > Toolbars and if there's not already a checkmark in front of Show Bottom Toolbars, click on it to enable that option. The Link pulldown in the lower left corner of the Bottom Toolbars is used to add hyperlinks:

Adding Internal Hyperlink within a Document:
When a document is added to SEC Publisher, an Anchor is inserted to the top of each page, allowing hyperlinks to those Anchors to be quickly and easily added anywhere in the document to jump to the top of a specified page. Additionally, Insert > Anchor can be used to insert an anchor anywhere in the document, allowing hyperlinks to jump directly to a specified location within the document, not just to the top of the page.
To add an internal hyperlink within a document:
1.
To add a hyperlink to an existing Anchor at the top of a page,
confirm the page number that the hyperlink will point to and
continue to step 2 below. To insert an Anchor to a specific
location within the document, navigate to that location, then click
on Insert > Anchor to
insert an Anchor to that
location. This will also temporarily add the name of that Anchor to the Link pulldown in the Bottom
Toolbars; however, while the Anchor will be saved in the
document, the name of that Anchor will not be saved in the
Link pulldown in the
Bottom Toolbars when exiting the HTML Editor, so it's best to
insert the Anchor and
add the hyperlink during the same edit session.
2. Select the text you want to link.
3. Click on the Link pulldown in the bottom toolbars and select which page the hyperlink should jump to or select the name of the Anchor that was inserted above.
Tip: If a document contains internal hyperlinks and it is inserted or merged with another document, the original hyperlinks may point to a different or incorrect page. Please add internal hyperlinks after collaboration (splitting, inserting or merging multiple documents).
Adding External Hyperlink to a Different Document within the Same Filing:
To add an external hyperlink to a different document within the same filing:
1. Select the text you want to link.
2.
Click on the Link pulldown
in the Bottom Toolbars and select (external link).
3. Click on the pulldown under Document Link and select the name of the document for the hyperlink.
Adding External Hyperlink to a Previous Filing in the SEC Archives:
To add an external hyperlink to a previous filing in the SEC archives:
1. Select the text you want to link.
2.
Click on the Link pulldown
in the Bottom Toolbars and select (external link).
3.
Select the URL Link radial button.
4. The URL Link address will be pre-populated with "http://www.sec.gov/Archives/edgar/data/". Add the rest of the URL, leaving the pre-populated portion as is, then click OK. If you get the following error, "Please save your project first and then re-do it again!", double-check to see if the hyperlink was actually added. If so, you can ignore this error.
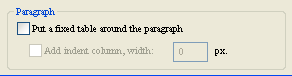
Put a Fixed Table around the Paragraph
Putting a HTML table around a paragraph can prevent the text from wrapping to the next line when you resize the browser. This is achieved using the ‘No Wrap’ property of a table. This is especially useful when the end of each sentence has a line break <br>.
Indentation
You can also insert indentation to the paragraph by specifying the indentation value.
Rules
You can also create paragraph borders using rules. You also have the option to select different border widths and colors.
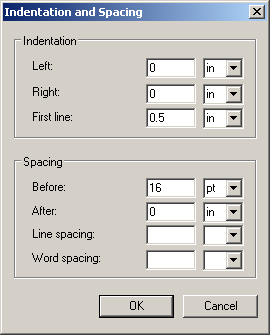
Formatting
You can use this feature to specify paragraph indentation and spacing for text and tables.
Note: Please enter the correct indentation and spacing parameters in pixel. A pixel (short for picture element) is a single point in a graphic image.
1. Indentation
a.
Left Indentation
Increase the left indent of an entire paragraph. Enter 0 to remove
the indentation.
b.
Right Indentation
Increase the right indent of an entire paragraph. Enter 0 to remove
the indentation.
c.
First Line
You will be able to create a first-line indent on a paragraph.
Enter 0 to remove the indentation.
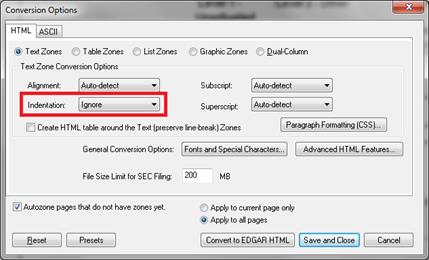
Warning: When using the ‘First Line Indentation’ in the ‘Paragraph Formatting (CSS)’ option, please set the indentation value under ‘Text Zone Conversion Options’ to ‘Ignore (EDGAR HTML > Text Zone Conversion Options > Indentation > Ignore). The indentation default value in the ‘Text Zone Conversion Options’ is set to ‘Auto-Detect’. Please note that only one of Indentation Options should be used.
2. Spacing
a. Before
Paragraph spacing determines the amount of space above a paragraph. Enter pixel numbers to change spacing before paragraphs. Enter 0 to remove before paragraph spacing.
b. After
Paragraph spacing determines the amount of space below a paragraph. Enter pixel numbers to change spacing after paragraphs. Enter 0 to remove after paragraph spacing.
c. Line spacing
Line spacing determines the amount of vertical space between lines of text in a paragraph. By default, lines are single-spaced, meaning that the spacing accommodates the largest font in that line, plus a small amount of extra space. Enter pixel numbers to change line spacing. Enter 0 to remove line spacing.
d. Word spacing
The word spacing property increases or decreases the white space between words. Enter pixel numbers to change word spacing. Enter 0 to remove word spacing.
Tip: Paragraph formatting is also available in the:
1. Right click menu:
Indentation and Spacing…
2. Drop down menu:
Format > Indentation and Spacing…
Related Topics
©1999-2022 BCL Technologies. All Rights Reserved. Unauthorized duplication or distribution prohibited.
| Converted from CHM to HTML with chm2web Standard 2.85 (unicode) |