


Table Properties
Cell Padding
Applying Cell Padding:
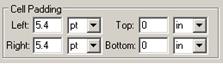
Tip: After changing the value within the Cell Padding, press ‘Enter’ to initiate change.
Cell Space (Cell Spacing)
Applying Cell Spacing:
![]()
Tip: After changing the value within the Cell Space, press ‘Enter’ to initiate change.
Bg Color (Background Color)
Applying Background Color to Table:
1. Select the table you want to change (by clicking on the borders of the table).
2. Under Bg Colorclick on the color selector box to select the color.
Tip: If you are changing the background color by typing in the color code in the space provided, press ‘Enter’ to initiate change.
Alignment
Applying Alignment to Table:
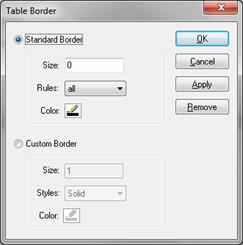
Border
Applying Border to Table:
Tip: After changing the value within the Border, press ‘Enter’ to initiate change.
Border Color
Applying Color to Table Border:
Tip: If you are changing the border color by typing in the color code in the space provided, press ‘Enter’ to initiate change.
Customize Borders
Use this option to select ‘Standard’ or ‘Custom’ borders, or to remove table borders.
1.
Standard
Borders
Select this option to create standard table borders. You will be
able to choose between different rules (all, cols, groups, none, or
rows), change the line width, and change border colors.
2.
Custom
Borders
Select this option to create custom table borders. You will be able
to choose between different styles (solid, double, or dotted),
change the line width, and change border colors.
3.
Remove
Select this option to remove table borders.
W (Table Width)
Changing Table Width:
Tip: After changing the value within the Table Width, press ‘Enter’ to initiate change.
Set Col Width Button
This wizard allows you manipulate column widths. It recognizes gutter and extra columns and allows you to tie the special columns to a fixed width. You can make the columns of equal width or type in your preference directly for every column. The wizard will reformat the table based on your choice.
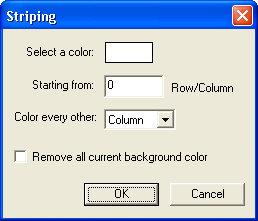
Striping Button (Create Row or Column Striping)
1. Select the table that you want to apply Row or Column Striping.
2. Click on the Striping button or from the menu, go to Table > Row or Column Striping.
3. Select the stripe color, specify the starting point, and specify row or column.
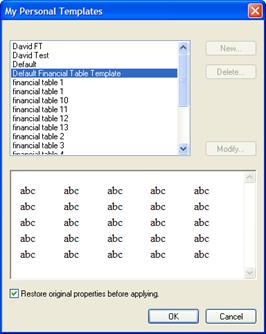
Template Button
Applying Table Template:
1. Select a Table.
2. Click on the Template button or from the menu, select Table > Templates > Apply.
3. Select the template you want and click ‘OK’.
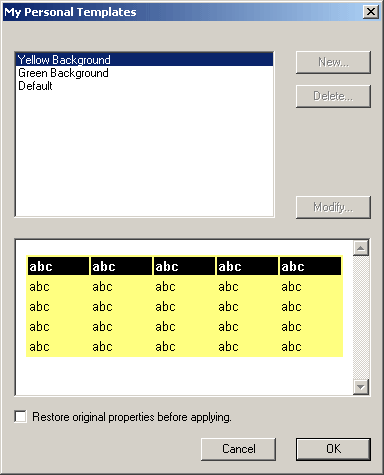
Removing Table Template:
1. Select a Table with a template.
2. From the menu, select Table > Templates > Delete.
Editing Table Template:
1. Select a Table with a template.
2. From the menu, select Table > Templates > Edit.
3. This will allow you to edit an existing template.
Creating New Table Template:
1. Select a Table with a template.
2. From the menu, select Table > Templates > New.
3. This will allow you to create a completely new template from scratch.
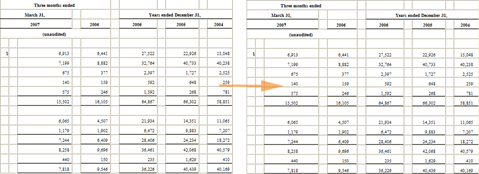
Stitch Table (Combine Multiple Tables into One)
Use this option to combine tables. This option is particularly useful for combining a long table that spans to multiple pages.
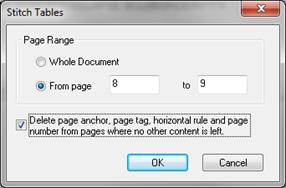
Tip: This option is to be used in those cases where a long table is broken up into multiple pages. This option is designed to work only if:
1. A table is the last zone on the page from which the stitching begins.
2. The first zone in the following page is the continuation of the same table.
Note: If there is any other zone between these two tables, stitching will not take place.
Set Equal Width (Distribute Column Width Equally)
This will set all columns in a table with the same width.

Set Custom Width (Distribute Columns Custom Width)
Set custom widths for each column of a table. The sum of all widths should be 100%.
Cell Properties will show up if you select the cell(s) in a table.
Tip: In the design screen, you can select cell(s) or row(s) or column(s) within a table by left-clicking and highlighting the text. If you want to un-select, please left click anywhere outside the table.

1.
![]() Merge Cells
Merge Cells
Merge selected cells into one cell.
2.
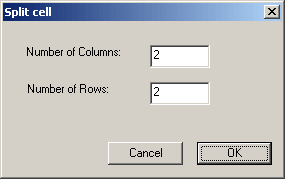
![]() Split Cell
Split Cell
Split selected cell into multiple rows and columns.
3.
![]() Insert
Insert
Insert additional row and column into selected cell.
4.
![]() Delete
Delete
Delete selected cell's column, row, or entire table.
5.
![]() Center Right
Alignment of
text inside a cell
Center Right
Alignment of
text inside a cell
If selected, this option will right-center align number columns. This means that the numbers will be right-aligned, but the whole number column will be centered within the column.
6.
![]() Select
Select
Select cells, rows, columns, all cells, table, gutter column, data column.
7.
![]() Make Table Header
Make Table Header
Set the first row(s) of a table as the header.
Tip: Make sure that you select from the very top row(s) when applying this function.
Col. Width (Column Width)
Specify the column width, as a percentage.
Tip: After changing the value within the Column Width, press ‘Enter’ to initiate change.
Row Height
Specify the row height.
Tip: After changing the value within the Row Height, press ‘Enter’ to initiate change.
VAlign (Vertical Alignment of Text within cells)
Set vertical alignment of the text within cells.
Indentation
Apply indentation to the text inside the selected cells.
Tip: After changing the value within the Indentation, press ‘Enter’ to initiate change.
Background (Background Color)
Specify the background color of selected cells.
Border (Border Color) of the Cell
Set the border color of the cell for Standard Borders, or configure Custom Borders.
Wrap Content
If checked, text inside the cells will wrap to a new line if the width of the text exceeds the width of the cell.
1. Insert a New Table, a Row, or a Column
2. Merge Cells
3. Split Cells
4. Delete Rows, Columns, or Table
5. Assign the First Row of a Table as Table Header
6. Financial Table Macro in Table Template
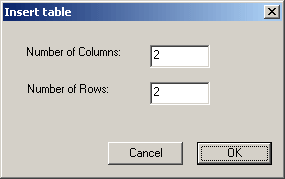
Inserting a New Table:
1. Click on the screen where the table will show up.
2. From the menu, select Table > Insert > Table.
3. Then specify the number of Columns and Rows that you require for the table.
Inserting a Row:
Inserting a Column:
Deleting a Row:
Deleting a Column:
Deleting a Table:
Use this option to assign rows as the header of a table. Once SEC Publisher knows which rows are the header rows, it can effectively apply Table Templates and Color Striping on the table.
Use this option to create/apply a Financial Table Macro Template in HTML Editor.
Creating a Financial Table Macro Template:
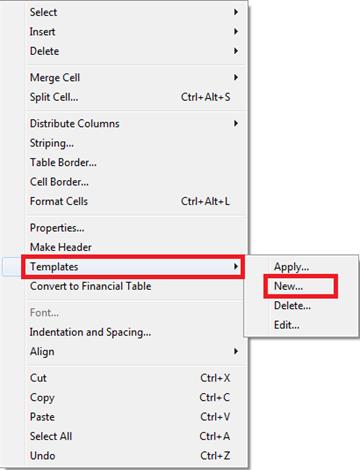
Use this option to create a Financial Table Macro template that will be used as a template for the rest of the tables in your documents. When you find a Financial Table that you would like to use as a template, follow the steps below:
1. Select the entire Table.
2. Right-click then select Templates(see the image below.)
3. Select New…, which will use the current Table format as a template for the rest of the table in the document.
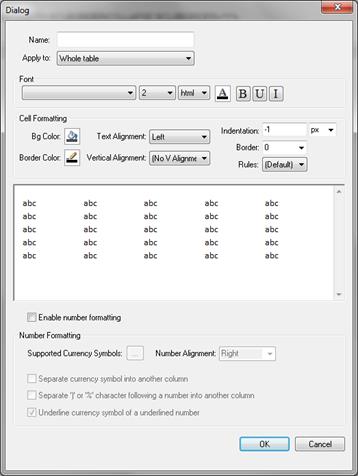
4. The following Financial Table Template dialog box will appear:
Applying a Financial Table Macro Template:
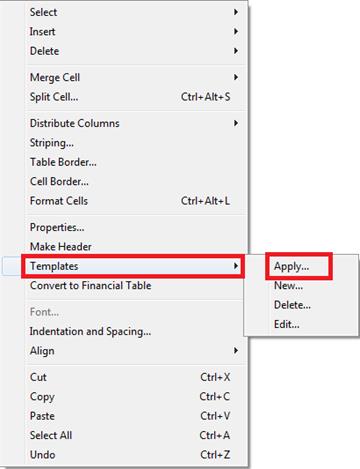
Use this option to apply a Financial Table Macro template that you have already created for the rest of the tables in your documents. When you find a Financial Table that you would like to apply your existing template into, follow the steps below:
1. Select the entire Table.
2. Right-click then select Templates (see the image below.)
3. Select Apply…, which will use the table template that you already created in the previous steps above.
4. The following Financial Table Template dialog box will appear:
Related Topics
©1999-2022 BCL Technologies. All Rights Reserved. Unauthorized duplication or distribution prohibited.
| Converted from CHM to HTML with chm2web Standard 2.85 (unicode) |